I’ve spent years fixing up homes, from my first fixer-upper to bigger renovation projects, and one question keeps coming up when we tackle walls and ceilings: should I go with tongue and groove or beadboard?
In this article, I walk you through a clear, honest comparison so you can decide which option fits your space, budget, and style best. You’ll see exactly how each material looks, installs, and holds up over time.
| Feature | Tongue and Groove | Beadboard |
| Installation Method | Interlocking edges, tight fit | Grooved planks with beads |
| Look | Smooth, seamless, modern or rustic | Classic vertical lines with shadow gaps |
| Cost | Usually mid to higher | Often more budget-friendly |
| Durability | Very strong when properly installed | Good but can show gaps over time |
| Best For | Floors, ceilings, feature walls | Wainscoting, accent walls, ceilings |
| Moisture Resistance | Depends on material choice | Better in painted versions |
| Ease of DIY | Moderate | Easier for beginners |
Key Differences Between Tongue And Groove and Beadboard
You’ll notice clear distinctions once you compare them side by side. Here’s what stands out most to me after handling both:
- Installation complexity varies significantly between the two
- Visual texture differs dramatically, with beadboard offering more pattern
- Cost per square foot usually favors beadboard for accent areas
- Durability levels change based on the specific application
- Fastening methods differ, affecting long-term stability
- Moisture performance depends heavily on material chosen
- Aesthetic versatility allows each to suit different design styles
- Maintenance routines look different for each option
- Expansion and contraction behavior varies in real-world conditions
- Sound and thermal qualities show noticeable differences
- Ability to hide fasteners and seams is not equal
- Repair difficulty increases with more complex interlocking systems
- Overall weight and handling characteristics feel distinct
- Best use cases rarely overlap completely
- Finishing options produce very different end results
These differences help explain why I sometimes choose one over the other for the same house depending on the room.
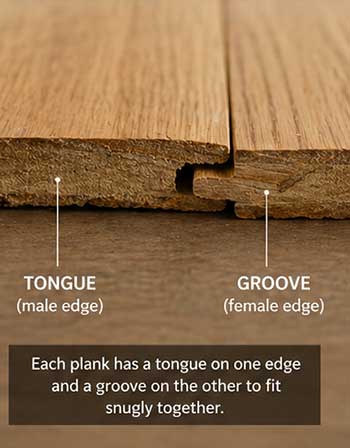
Key Features of Tongue and Groove
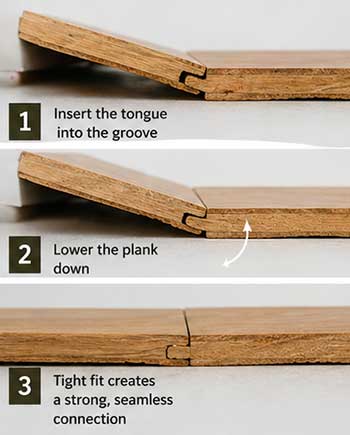
Tongue and groove offers several standout characteristics that make it appealing for many projects. The precision-machined edges create a strong mechanical connection between boards, resulting in joints that stay tight for years.
You can choose from multiple wood species including pine, oak, maple, cedar, and cypress, each bringing its own grain pattern and color tone. Thickness options range from slim ½-inch boards ideal for walls to robust ¾-inch or thicker planks perfect for flooring.
The system supports hidden fastening techniques such as blind nailing through the tongue, which keeps the visible surface clean and free of nail holes. Solid wood versions provide natural insulation and can dampen sound noticeably better than thinner paneling.
You also have the freedom to finish the material on site with stains that highlight the natural grain or with paint for a cleaner look. In flooring applications, the interlocking design distributes weight evenly and resists shifting under foot traffic.
Many profiles also allow for creative layouts like diagonal, herringbone, or even mixed-width patterns that add visual interest without breaking the seamless feel. The material performs reliably in both dry interior spaces and protected exterior applications when properly sealed.
Pros of Tongue and Groove
I keep coming back to tongue and groove because the advantages really add up in real projects. Here’s what stands out to me after multiple installations:
- Creates a smooth, continuous look that feels custom and high-end
- Extremely durable against daily wear, especially on floors where it handles heavy traffic without complaint
- Minimizes visible seams, giving a more expensive and polished appearance
- Works beautifully with both paint and stain finishes, letting the wood grain shine when desired
- Offers great stability once installed correctly, with less risk of boards separating over time
- Can handle temperature and humidity changes better than many flat panel options
- Provides a solid base for heavy use areas like hallways, living rooms, and kitchens
- Allows creative layouts like herringbone or diagonal patterns that elevate the design
- Hides fasteners well when using blind nailing or specialized clips
- Adds real character when using reclaimed or knotty woods that tell a story
- Performs well in both traditional and contemporary homes without looking out of place
- Can increase the perceived value of the space through its quality feel
- Reduces the chance of boards cupping, warping, or separating over many years
- Delivers excellent acoustic qualities, making rooms feel quieter and more peaceful
- Supports radiant floor heating systems effectively when installed over proper subfloors
You’ll appreciate how quiet the finished surface feels underfoot or how the ceiling seems to disappear into one clean plane that makes the room feel larger.
Cons of Tongue and Groove
Of course, nothing is perfect. I’ve run into a few headaches that you should know about before you start.
- Higher material cost compared to simpler paneling options, which can stretch budgets on large surfaces
- Installation takes more time and patience, especially for beginners who are still learning the technique
- Requires precise cutting and fitting to avoid even small gaps that become noticeable later
- Can be trickier to replace a single damaged board later because of the interlocking system
- Heavier materials make handling and lifting more difficult, particularly on ceilings
- Needs careful acclimation to room temperature and humidity before installation begins
- Blind nailing requires practice to get consistent depth and angle without damaging the tongue
- Limited color options if buying pre-finished versions instead of finishing on site
- May need extra blocking behind walls for secure attachment in certain applications
- Dust and mess during installation can be significant and requires good cleanup planning
- Professional installation often recommended for best results on large or complex projects
- Not the fastest option if you’re working on a tight timeline or rental property flip
- Some thinner versions can feel less substantial underfoot or when knocked
- Expansion gaps must be managed carefully around room perimeters
- Initial learning curve can lead to wasted material during the first few rows
I learned the hard way that rushing the install leads to visible lines later, so plan extra time and take breaks when needed.
Key Features of Beadboard
Beadboard stands out because of its decorative beaded edges that create repeating shadow lines, giving the surface nice visual texture and depth. The beads are usually spaced consistently, producing a predictable and pleasing rhythm that draws the eye upward or along the wall.
You can purchase it as individual planks or in convenient 4×8 sheets that speed up installation on larger areas. Material choices include real wood, MDF, and moisture-resistant PVC, making it suitable for different environments.
Many versions come pre-primed and ready for paint, saving you time on preparation. The design incorporates small grooves that help accommodate minor seasonal movement without showing large gaps.
Beadboard can be installed vertically to add height, horizontally for a casual feel, or even diagonally for more visual interest. Its lighter weight compared to solid tongue and groove boards reduces fatigue during installation.
The profile pairs naturally with chair rails, baseboards, and crown molding to create a complete, finished look. Waterproof PVC versions perform especially well in bathrooms, laundry rooms, and other humid spaces where traditional wood might struggle.
Also Read: Alternatives To Dricore Smartwall.
Pros of Beadboard
What I enjoy most about beadboard is how approachable it feels for weekend warriors like me.
- Budget-friendly way to add texture and interest to walls without spending a fortune
- Quick visual impact that transforms plain rooms fast and makes them feel more complete
- Forgiving installation since the beads help hide small mistakes and uneven cuts
- Excellent choice for wainscoting or lower wall treatments that protect against scuffs
- Creates height illusion when run vertically, making small rooms feel taller and airier
- Makes spaces feel cozy, warm, and finished even on a modest budget
- Works beautifully in cottages, farmhouses, coastal homes, and traditional settings
- Easy to paint any color you want, allowing complete customization
- Good moisture resistance when using PVC or well-sealed primed versions
- Simple to install around outlets, switches, and other obstacles
- Pairs well with other trim elements like chair rails and decorative caps
- Creates nice rhythm and pattern on large surfaces without looking chaotic
- Can be installed directly over existing drywall in many cases, saving time
- Less intimidating for first-time DIYers who want professional-looking results
- Offers great value for the visual upgrade it delivers
- Provides a classic backdrop that complements many furniture styles
- Allows mixing of different board widths for custom patterns and interest
You walk into the room after painting and suddenly it has personality and warmth that plain walls never delivered.
Cons of Beadboard
Still, I’ve seen a few limitations that might matter to you depending on your goals.
- Beads can collect dust and require more regular cleaning attention to stay looking fresh
- Visible seams between sheets if not perfectly joined or caulked properly
- Can look busy or overwhelming in very large open-concept spaces
- MDF versions can swell or degrade if exposed to excessive moisture over time
- Limited to more traditional or country aesthetics that may not suit ultra-modern homes
- May feel dated in minimalist or industrial-style interiors
- Grooves make painting slightly more time-consuming because of all the detailed edges
- Not as structurally strong as solid tongue and groove for load-bearing applications
- Can warp or cup if not properly sealed on all sides before installation
- Replacement of damaged sections can sometimes be noticeable if color or texture varies
- Thinner materials may dent or scratch easier in high-traffic family areas
- Horizontal installation sometimes shows more imperfections in the underlying wall
- Requires careful caulking at all joints and edges for a clean finished look
- Shadow lines can emphasize any misalignment if the first row isn’t perfectly level
- May need additional trim pieces to hide transitions at ceilings or floors
The cleaning part surprised me at first, but regular dusting keeps it looking sharp with minimal extra effort.
Which One Should You Choose?
After comparing both options extensively, I usually ask myself a few questions before deciding. What is the main purpose of this surface? How much traffic or moisture will it see? What feeling do I want the room to have?
What’s my actual budget and timeline?
You might lean toward tongue and groove if you want a clean, modern, or high-end look with maximum durability. I reach for it on ceilings, floors, or full-height accent walls where seamless appearance matters most.
Beadboard wins when I need quick charm, traditional character, or a budget-friendly texture on partial walls. It shines in bathrooms, laundry rooms, mudrooms, and cottage-style spaces.
Many projects actually combine both successfully. I once used tongue and groove on the ceiling and beadboard wainscoting on the lower walls. The contrast felt intentional and elevated the entire room.
Also Read: Comparison of Shiplap And Nickel Gap.
Frequently Asked Questions (FAQ)
No. Tongue and groove refers to the interlocking joint system, while beadboard describes planks with decorative beaded edges. They are different products with distinct looks and uses.
Beadboard is typically cheaper than shiplap, especially when using sheet goods or basic MDF versions.
Not at all. Beadboard remains popular in traditional, farmhouse, and coastal styles and continues to appear in current design trends.
It depends on your style. Shiplap offers a casual, rustic look while tongue and groove provides a smoother, more refined or seamless appearance. Neither is universally better.
Wrapping Up
Now that we’ve walked through all the details together, you have a much clearer picture of how tongue and groove and beadboard compare in real life. I hope this helps you feel excited rather than overwhelmed about your next project.
You now know the strengths, weaknesses, and best applications for each option. Whether you choose the seamless strength of tongue and groove or the charming texture of beadboard, you’re making a solid choice that can transform your space beautifully.
Trust your instincts, measure twice, and enjoy the process. Your finished room will thank you every single day.