I’ve spent months renovating different rooms in my home, and nothing sparks more debate among friends and fellow DIYers than choosing wall paneling.
When I first tackled an accent wall, I kept hearing about shiplap versus nickel gap. Both deliver that textured, character-filled look that makes a space feel warmer and more inviting, but they aren’t the same.
In this article, I share my hands-on experience comparing the two so you can decide which fits your project best. I’ll cover their key differences, features, pros, cons, and practical tips from a real user’s perspective.
By the end, you’ll have a clear sense of what works for your walls, ceilings, or even exteriors.
| Aspect | Shiplap | Nickel Gap |
| Joint Type | Rabbet (overlap) | Tongue-and-groove with built-in spacer |
| Gap Appearance | Overlapping boards, variable spacing possible | Consistent nickel-width gap (~1/16 to 1/8 inch) |
| Nail Visibility | Often face-nailed, visible | Hidden in tongue, cleaner finish |
| Installation Ease | Requires careful spacing, more skill | Interlocks easily, faster and more forgiving |
| Aesthetic | Rustic, farmhouse, textured charm | Clean, modern, crisp lines |
| Cost (approx. per sq ft) | $2–7 | $2.50–8 |
| Best For | Coastal, cottage, traditional looks | Contemporary, minimalist, or updated farmhouse |
| Maintenance | Dust collects in overlaps | Easier to wipe due to uniform gaps |
What Is Shiplap?
I remember walking into my first fixer-upper and seeing those overlapping wooden boards on the walls in magazines.
Shiplap originally came from practical barn siding where boards overlapped to keep weather out.
Today, we use it indoors for that cozy, lived-in feel.
The boards feature a rabbet cut along the edge, letting one board sit slightly over the next.
This creates a subtle shadow line and depth.
When I installed it in my living room, the overlapping edges gave the wall real dimension, especially under angled lighting. It feels tactile—you notice the texture when you run your hand across it.
Key features of shiplap that stood out to me include its forgiving nature with imperfect walls. The overlap hides minor misalignments better than flush options.
Many versions come in pine or cedar, which add natural grain if you choose to stain instead of paint. I love how it can handle both horizontal and vertical orientations, changing the whole vibe of the room depending on direction.
Key Features of Shiplap
- Overlapping rabbet joints create natural shadow lines and depth.
- Often made from solid wood like pine, which brings warmth and slight variations in tone.
- Visible or semi-visible fasteners that can add to the rustic character.
- Thicker profiles available that feel substantial on the wall.
- Versatile for painting or light staining to highlight grain.
- Good sound absorption thanks to the layered look.
Pros of Shiplap
I genuinely enjoyed working with shiplap in spaces where I wanted that classic charm. Here is what I found impressive after living with it:
- Rustic authentic appeal: It screams farmhouse or coastal cottage without trying too hard. The overlaps give a handmade, historical feel that many people crave.
- Hides imperfections well: Minor gaps or uneven studs disappear under the overlapping edges. This saved me hours of extra prep work on older drywall.
- Texture and dimension: Under different lighting, the shadows shift, making the wall dynamic rather than flat. Guests always comment on how inviting it makes the room.
- Affordable entry point: Basic pine shiplap can be budget-friendly if you source from big box stores or mill it yourself.
- Versatile styling: It pairs beautifully with distressed furniture, shiplap ceilings, or mixed with beadboard for layered interest.
- Easy to customize spacing: You control the reveal, allowing wider or tighter overlaps depending on the mood you want.
- Good for accent walls: One wall in shiplap draws the eye without overwhelming the entire space.
- Natural wood options: Real wood versions can be sanded, stained, or painted multiple times over the years.
The character it adds still makes me smile every time I walk into that room. It feels like the walls have a story.
Cons of Shiplap
Of course, it wasn’t all smooth sailing. I learned some frustrations the hard way:
- Installation requires precision: You must maintain consistent overlap or the look falls apart quickly. One slipped board and you spend time fixing it.
- Visible nails: Face nailing leaves holes that need filling and touch-up painting, especially noticeable in lighter colors.
- Dust collector: Those overlapping edges trap dust and cobwebs. Cleaning takes more effort with a vacuum attachment or microfiber cloth.
- Potential for uneven gaps: Without experience, spacing can vary, leading to a less polished final result.
- Harder on ceilings: Working overhead while managing overlaps feels awkward and time-consuming.
- Painting challenges: Getting into the joints requires careful brushwork or spraying to avoid drips and missed spots.
- Warping risk: If the wood isn’t properly dried, boards can cup or twist over time, especially in humid areas.
- Heavier material: Thicker solid wood planks mean more weight to handle during install.
These issues didn’t ruin the project for me, but they made me appreciate alternatives when speed and cleanliness mattered more.
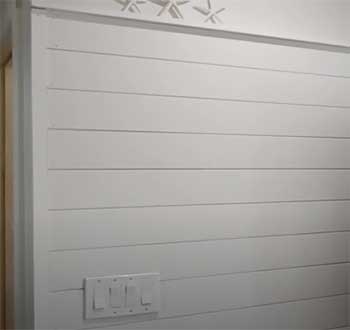
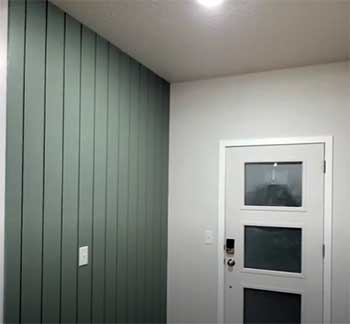
What Is Nickel Gap?
After finishing my shiplap wall, I tackled a bedroom using nickel gap and immediately noticed the difference.
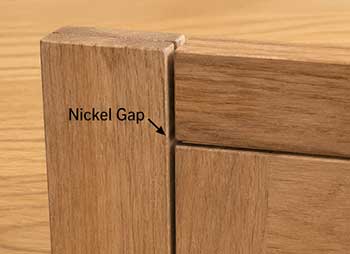
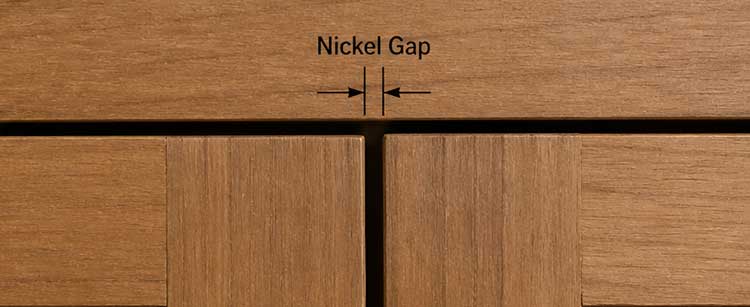
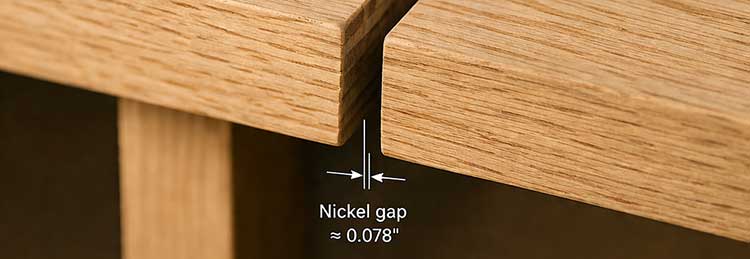
Nickel gap gets its name from the small, consistent space left between boards—roughly the thickness of a nickel.
Unlike traditional shiplap, modern nickel gap usually features tongue-and-groove edges with a built-in spacer or bevel that ensures perfect uniformity every time.
The boards butt together with that deliberate narrow gap, creating crisp, clean shadow lines without actual overlapping. I painted the wall behind black or dark before installing, which makes the gaps pop dramatically.
The result felt more contemporary and tailored, like the wall was professionally milled rather than hand-crafted.
Key Features of Nickel Gap
- Tongue-and-groove interlocking system that clicks together smoothly.
- Precise, factory-created nickel-width gaps for shadow effect without overlap.
- Often end-matched, so boards connect seamlessly at ends without always hitting studs.
- Hidden nailing in the tongue for a smooth, fastener-free face.
- Available in pine, poplar, MDF, or even PVC for moisture-prone areas.
- Consistent board widths and smooth surfaces that paint beautifully.
- Lighter weight options in engineered materials that make handling easier.
What I loved most was how the uniform gaps gave the wall a modern rhythm. It feels intentional and refined.
Pros of Nickel Gap
Living with nickel gap convinced me it’s often the smarter choice for many projects today. Here’s why I keep recommending it:
- Faster, easier installation: The interlocking tongue-and-groove means boards align perfectly with minimal measuring. I finished the bedroom wall in half the time compared to shiplap.
- Concealed fasteners: No visible nail holes on the face—huge win for a clean, high-end look that needs less touch-up.
- Uniform appearance: Every gap looks identical, creating a sleek, professional result even if you’re not a pro installer.
- Modern aesthetic: It reads cleaner and more contemporary while still offering texture. Perfect for updating older homes without looking dated.
- Less waste: End-matching and consistent sizing reduce scrap, which saved me money on materials.
- Better for ceilings: The stable interlocking makes overhead work far less frustrating—no fighting overlaps while balancing on a ladder.
- Easier cleaning: Narrow, open gaps are simpler to dust or wipe than deep overlaps.
- Versatile materials: MDF or primed versions come ready to paint and resist warping better in some climates.
- Great shadow play: The consistent nickel gap creates beautiful, predictable lines that enhance lighting design.
- Forgiving on imperfect walls: The system hides minor variations while maintaining overall straight lines.
I genuinely felt prouder of the nickel gap wall because it looked intentional and polished right away.
Cons of Nickel Gap
No option is perfect, and I noticed a few drawbacks during and after installation:
- Higher material cost sometimes: Premium tongue-and-groove versions can run a bit more per square foot than basic shiplap.
- Requires painting the substrate: You usually paint the wall behind dark to emphasize gaps, adding an extra step and material.
- Less rustic character: If you crave heavy texture and knots, the smoother, more uniform look might feel too modern or plain.
- Nail hole filling still needed: While face is clean, you fill tongue nails and any imperfections.
- Limited staining options: Many versions work best painted; natural wood grain shows less dramatically.
- Can highlight imperfections in cheap materials: Lower-grade boards may show rough edges in the gaps if not sanded well.
- Dust in gaps over time: Though easier than shiplap, narrow gaps still collect fine dust in high-traffic areas.
- Learning curve for first-timers: Understanding the tongue direction and starting layout matters for best results.
These were minor compared to the overall satisfaction, but worth planning around.
Key Differences Between Shiplap And Nickel Gap
I often get asked how to choose, so let’s break it down clearly through my experience:
- Installation method: Shiplap relies on careful overlapping and spacing you manage yourself. Nickel gap uses interlocking pieces with built-in consistency, making the process feel more like assembling a puzzle.
- Visual style: Shiplap delivers overlapping, slightly irregular charm with deeper texture. Nickel gap offers crisp, even lines and a tailored modern feel.
- Nailing technique: Face nailing is common with shiplap, while nickel gap hides nails beautifully in the tongue.
- Gap consistency: With shiplap, you decide and maintain the reveal manually. Nickel gap guarantees the same narrow gap throughout.
- Maintenance level: Overlaps in shiplap trap more debris. Nickel gap’s open but uniform gaps clean quicker.
- Project suitability: Shiplap shines in casual, rustic, or heavily textured spaces. Nickel gap excels in contemporary updates, ceilings, or when you want speed and precision.
- Material behavior: Solid wood shiplap can show more natural movement. Engineered nickel gap options often stay straighter longer.
- Lighting interaction: Both create shadows, but shiplap’s overlaps produce softer, varied effects while nickel gap gives sharp, rhythmic lines.
- Cost and waste: Basic shiplap can be cheaper upfront but may waste more from errors. Nickel gap often wastes less despite potentially higher per-foot price.
- Long-term durability: Both last well when installed correctly, but nickel gap’s interlocking reduces shifting over time in some applications.
These differences helped me pick the right one for each room based on the mood I wanted to create.
Which One Should You Choose?
From my projects, I lean toward nickel gap when I want efficiency and a polished result. It feels like the evolved version that solves many shiplap headaches while keeping the charm.
Yet shiplap still wins for me in spaces where raw, rustic texture matters most—like a mudroom or lakeside cabin.
Consider your skill level, time, budget, and desired vibe. If you’re new to DIY, nickel gap’s forgiving interlock might boost your confidence. For traditional warmth, shiplap delivers that unmistakable character.
Also Read: Differences Between MDF Baseboard And Wood Baseboard.
Frequently Asked Questions (FAQ)
It depends on you. Nickel gap is often better for easier installation and a cleaner modern look. Shiplap wins for authentic rustic texture and charm. I prefer nickel gap for most current projects.
Designers are moving toward more layered textures like wainscoting, board and batten, or sophisticated plaster and fabric treatments that add old-world elegance without the farmhouse overload.
Not always. Nickel gap can cost slightly more due to the milling, but easier installation and less waste can balance it out. Basic shiplap sometimes comes cheaper if you buy raw materials.
Pine offers a great balance of cost, availability, and paintability. Poplar gives smoother results with fewer knots. For moisture areas, consider primed MDF or PVC alternatives that resist warping.
Wrapping Up
After trying both in my own home, I see why the conversation around shiplap versus nickel gap continues. You get beautiful textured walls either way, but the details matter.
Nickel gap solved installation frustrations for me while delivering crisp results I still admire daily. Shiplap gave me that cozy, storybook feel I wanted in other spots.
Think about how you use the room, how much time you have, and the overall style you’re building. Both options add warmth and interest that painted drywall simply can’t match. Pick the one that matches your personality and project goals—you’ll love the transformation.