
I set out to explore SkyLift roof riser alternatives because I wanted clearer options for attaching a patio cover or pergola to a house roof without the usual headaches of height, pitch, and waterproofing.
My goal here is to walk you through practical choices that solve the same problems SkyLift addresses so you can pick what fits your project, budget, and roof type.
Top Alternatives to SkyLift Roof Risers
- Patio Roof Riser Systems
- Traditional Ledger Board Mounting
- Freestanding Post-Supported Structures
- Custom Fabricated Steel Brackets
- Generic Roof Mount Brackets
- Direct Rafter or Truss Attachment Methods
Patio Roof Riser Systems
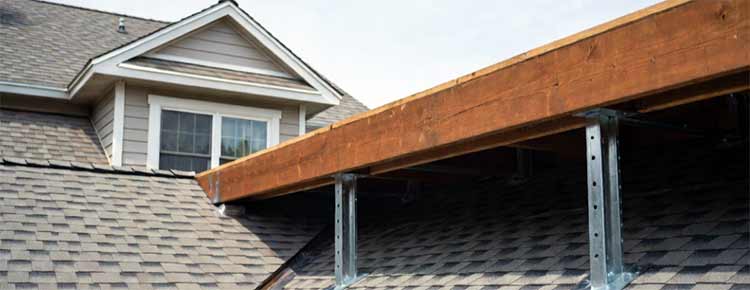
I first looked at products that mirror the SkyLift approach almost one-to-one. Patio Roof Riser systems, including the LO-PRO versions, sit on top of the existing roofing material and create a raised connection point for the beam of your patio cover or pergola.
The design uses an adjustable pitch mechanism locked in place with steel-alloy pins and a high-grade bolt. That means you set the exact slope you need for water runoff and then secure it so the angle stays put under load.
From an analytical standpoint, these systems shine when you want to keep the structure outside the home’s dry space. Installation happens just beyond the exterior wall line, which lowers the risk of interior water intrusion compared with methods that dig deeper into the framing.
The raised profile also creates that same chimney effect SkyLift promotes—hot air and moisture escape upward instead of trapping under a low-slope cover. Headroom improves, debris slides off more easily, and gutters stay clear because the new roof starts above them.
I found the cost angle particularly useful. Professional rafter-tie jobs can run several thousand dollars once labor and structural engineering enter the picture. A Patio Roof Riser kit often lands in a lower price bracket while still carrying engineered ratings.
You still need proper flashing and structural screws into solid framing, but the hardware itself arrives ready for a relatively straightforward install if you already understand roofing basics. For someone who wants the elevated look and function without hunting for a specialty SkyLift dealer, this route keeps the project moving.
One limitation I noted is availability and exact sizing. Not every saddle width matches every beam, so double-checking the nominal lumber dimensions matters. Still, for most standard 4x beams the LO-PRO style works cleanly, and the patent-pending adjustable design gives flexibility that fixed brackets sometimes lack.
Traditional Ledger Board Mounting
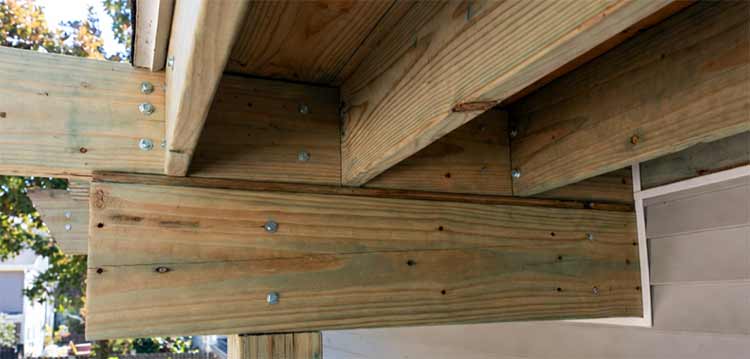
When I stepped back from specialized risers, the classic ledger board method kept coming up in real projects.
You attach a horizontal pressure-treated or cedar ledger to the house wall under the eaves, usually into the rim joist or doubled top plate with structural lag screws or through-bolts. The patio cover or pergola beams then rest on or bolt to that ledger. No roof surface penetration occurs in the purest version of this approach.
Analytically, this method wins on simplicity and cost for many homeowners. Materials are available at any lumberyard, and the connection stays within the wall plane where water management is already designed.
You avoid flashing complexities on the roof plane itself. If your eaves already provide enough height, the finished cover can sit at a comfortable level without extra risers. Structural engineers often prefer this route because the load path stays clear and inspectable.
The trade-offs become obvious once you measure clearances. Low roof lines force the cover downward, which can create a cave-like feel and poor drainage. Airflow suffers compared with a raised system, and you may need additional posts closer to the house to carry the load.
I have watched projects where the ledger worked beautifully until a heavy snow load or high wind tested the connection; proper lag sizing and blocking become non-negotiable. Still, for modest spans and existing wall strength, the ledger remains a reliable, code-friendly choice that many inspectors understand immediately.
Also Read: A Homeowner’s Experience With Mirador Pergola.
Freestanding Post-Supported Structures
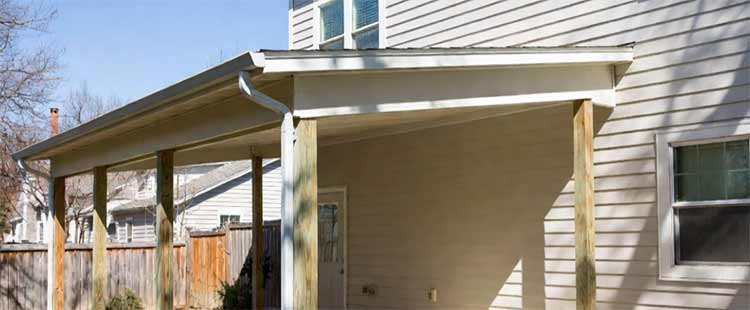
I next considered walking away from the house roof entirely. A freestanding patio cover or pergola relies on its own posts and beams, placed a short distance from the house wall. The structure stands independently, often with a small gap that can be closed with flashing or a simple trim piece if desired.
This approach removes every roof-attachment risk. No flashing failures, no concerns about voiding a roof warranty, no structural load transferred into the house framing. You gain complete freedom with height, pitch, and footprint.
Analytical evaluation shows strong advantages for metal roofs, tile roofs, or any surface where penetrations feel risky. Maintenance stays simpler because the house roof remains untouched. In high-wind zones the freestanding design can actually perform better when engineered with proper footings and bracing, because the house is not part of the load path.
The downside sits in the footprint and cost of posts. Each post needs a solid footing below frost line in many climates, and the posts themselves occupy patio space. Aesthetically some people prefer the clean line of a structure that appears to grow from the house.
Yet when I weighed the long-term peace of mind against those drawbacks, freestanding often scored highest for homeowners who plan to stay in the house for decades. You can still achieve the elevated look by setting post heights higher than the eaves, creating a visual overlap without physical attachment.
Custom Fabricated Steel Brackets
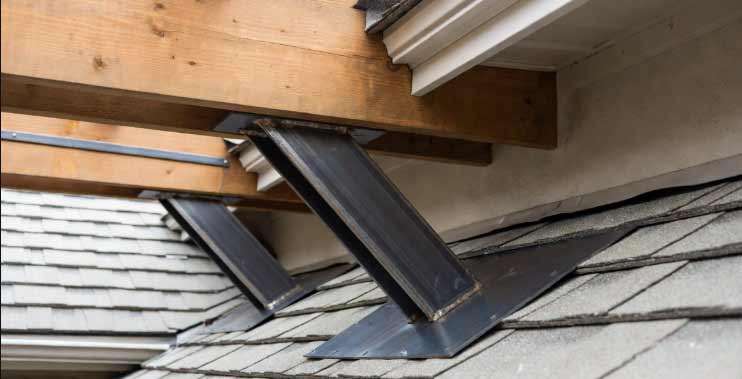
For projects that fall between catalog products and pure DIY, custom steel brackets offer a middle path. Local fabricators or online metal shops can cut, weld, and powder-coat brackets to the exact height, saddle width, and pitch you need.
The finished pieces then bolt or lag into the roof framing or wall top plate much like a SkyLift unit.
I appreciate the analytical flexibility here. You specify the exact rise—twelve inches, twenty-four, even thirty-six—and the fabricator builds to that number. Load ratings can be calculated for your specific snow and wind zone.
Finish options range from black powder coat to galvanized or stainless for coastal areas. Because the brackets are made to order, you avoid the compromise of forcing a standard product into a non-standard situation.
Installation still requires careful flashing and solid attachment points. The cost sits higher than off-the-shelf risers because of the custom work, yet for complex roof geometries or heavy timber beams the investment pays off.
I have seen these brackets used successfully on both asphalt and metal roofs when the fabricator includes a base plate designed for the roofing type. The result looks intentional rather than adapted, which matters if the finished space will be highly visible.
Also Read: A Homeowner’s Experience With StruXure Pergola.
Generic Roof Mount Brackets
Hardware stores and online marketplaces carry a range of generic roof mount brackets marketed for pergolas, gazebos, and patio covers. These usually feature a vertical post or riser with a saddle on top and a base plate meant to lag into framing. Heights vary, and some include simple pitch adjustment.
From a practical user viewpoint these brackets solve the basic elevation problem at the lowest entry price. You can often buy a set, install them with structural screws, and move on. Analytical comparison shows they work best on short spans and light-duty covers.
The steel thickness and weld quality vary widely, so checking load ratings becomes essential. Many lack the engineered documentation that SkyLift or Patio Roof Riser products provide, which can complicate permit approval in strict jurisdictions.
Still, for a straightforward DIY shade structure over a deck, the generics deliver functional results. Pair them with proper flashing boots and sealant, and the weather resistance holds up reasonably well. I treat them as a budget-conscious step rather than a permanent engineered solution, but they fill a real gap when the specialized brands feel out of reach.
Direct Rafter or Truss Attachment Methods
The final route I examined involves opening the roof surface, locating the rafters or trusses, and building custom supports that rise from those structural members. Once the new posts or beams sit at the desired height, the roofing is patched and flashed around the penetrations.
This method gives the strongest structural connection because the load path goes straight into the primary framing. Height and pitch become completely controllable. Analytical review shows it is often the preferred approach for very large or heavily loaded covers where off-the-shelf risers cannot carry the required capacity. Professionals who already work on roofs find the process familiar.
The drawbacks are significant. Every penetration creates a potential leak point if flashing is imperfect. Labor and material costs rise quickly. Roof warranties may be affected. Homeowners who lack roofing experience should hire qualified help.
When executed correctly, though, the finished assembly feels rock-solid and can outlast many surface-mounted options.
Also Read: A Homeowner’s Experience With PURPLE LEAF Pergola.
Frequently Asked Questions (FAQ)
No, Home Depot does not typically stock SkyLift roof risers. They are available through the manufacturer and online retailers.
Yes, SkyLift roof risers work on metal roofs when paired with the appropriate base such as a gimbal base designed for that surface.
Yes, roof risers improve height, pitch, airflow, and water management for patio covers and pergolas when properly installed and engineered.
The number depends on beam span and load requirements, commonly one every four to six feet, but always confirm with structural guidelines for your specific project.
Wrapping Up
I weighed all six alternatives against the original SkyLift goal of raising a patio or pergola roof cleanly, securely, and with good drainage and airflow. Each path solves the core problem in a different way, and the right choice depends on your roof type, local codes, budget, and tolerance for complexity.
My intent throughout has been to give you clear, practical information so you can decide which route matches your project without guesswork.