
You know that moment when you pull a fresh loaf of bread from the oven, and the aroma fills your home with pure joy?
That is exactly why I recommend you grab the KitchenAid Grain Mill attachment today. It transforms your stand mixer into a powerhouse for creating fresh flour packed with nutrients and incredible flavor.
If you bake regularly or want to elevate your cooking, this tool delivers convenience and quality that store-bought options simply cannot match.
You will taste the difference immediately, and your family will thank you for it. In just a few minutes of setup, you unlock a world of homemade possibilities that feel rewarding and delicious.
My Hands-On Experience Using the KitchenAid Grain Mill
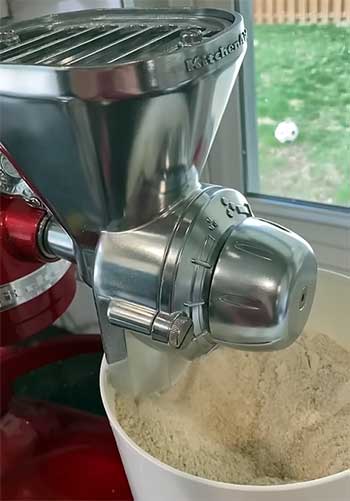
I remember the first time I attached this grain mill to my KitchenAid stand mixer.
You slide it onto the power hub, tighten the knob securely, and you are ready to go within seconds.
I started simple with some hard red wheat berries I picked up locally.
I set the adjustment knob to a medium coarseness at first because I wanted to see how it performed without pushing it too hard.
As the mixer hummed to life, the grains fed steadily into the burrs, and out came this fragrant, freshly milled flour into my waiting bowl.
The whole process felt satisfying, like I was connecting directly with my food in a way that supermarket bags never allow.
I milled about two cups initially, and the flour had this wonderful warmth and texture that made my pancakes taste nuttier and more flavorful than ever before.
You can adjust from coarse cracked grains perfect for cereals all the way down to finer settings for bread dough.
Over the next few weeks, I experimented a lot. I tried soft white wheat for cakes and cookies, which gave them a tender crumb you have to experience to believe. Corn for homemade polenta turned out fantastic, and even rice and oats worked beautifully for gluten-free blends.
One afternoon I decided to make a big batch of sourdough, milling enough fresh flour for several loaves. The dough rose better, developed deeper flavors during fermentation, and the final bread had this complex taste that my friends raved about at dinner.
You feel a real sense of accomplishment when you serve something made from scratch like this. However, I quickly learned to respect the limits. After grinding around eight to ten cups, I always give the mixer a good break to avoid overheating.
The attachment itself stayed cool enough, but the mixer motor works noticeably harder during longer sessions. Cleaning took only a few minutes with a brush and dry cloth, which kept things efficient.
I have used it for family breakfasts, weekend baking projects, and even holiday gifts like flavored pancake mixes. Each time, the freshness shines through. You notice how the natural oils in the grains stay vibrant instead of going stale on shelves.
My kids love helping pour grains into the hopper, turning it into a fun activity rather than a chore. Sure, it takes patience compared to dumping pre-milled flour, but that time invests in better health and superior taste.
After months of regular use, I still reach for it whenever a recipe calls for flour because the results speak for themselves. You will wonder how you ever baked without it once you try fresh milled grains in your favorite recipes.
Pros of Choosing the KitchenAid Grain Mill
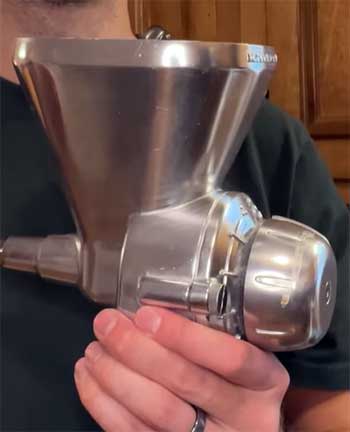
- Convenient Attachment Design Saves Space and Money: You already own the stand mixer, so this adds powerful milling capability without buying another bulky appliance. I love how it stores neatly in a drawer until I need it, freeing up precious counter space in my kitchen. You get excellent value because one tool handles mixing, grinding, and more. The money saved means you can spend more on quality grains while enjoying a clutter-free workspace that keeps your kitchen feeling organized and ready for action.
- Versatile Grind Settings for Every Need: With multiple adjustment levels, you control everything from cracked wheat for hearty breakfast porridge to finer flour suitable for artisan breads. I switch settings easily mid-project, which lets me create custom blends that perfectly match my recipes. You experiment freely and discover new textures that elevate your baking game. This flexibility has allowed me to create everything from coarse cornmeal for perfect cornbread to pastry flour that produces the flakiest pie crusts you can imagine.
- Fresh Flavor and Nutrient Boost in Every Batch: Grinding your own grains preserves natural enzymes, oils, and nutrients that degrade quickly in packaged flour. My baked goods taste noticeably richer, and I feel better knowing exactly what goes into our food. You enjoy healthier meals with superior taste that store versions cannot replicate. The difference shows up in everything from morning muffins to evening dinner rolls, where the vibrant taste makes you slow down and truly savor each bite.
- Easy Setup and Compatibility with Your Existing Mixer: It attaches in moments and works seamlessly with most KitchenAid models. No complicated assembly means you start milling right away. I appreciate this simplicity, especially on busy days when I want fresh flour without hassle. You simply click it into place and get going, which fits perfectly into a hectic schedule without adding extra steps or frustration.
- Durable Metal Construction Built to Last: The all-metal build feels solid and reliable through repeated uses. I have put it through many sessions without issues, and it continues performing well. You invest in quality that stands up to regular home use. After countless grinds, the parts still align perfectly and show minimal wear, giving me confidence that this purchase will serve my family for years ahead.
These advantages make daily or weekly milling feel approachable and rewarding. You gain control over ingredients while saving money long-term by buying whole grains in bulk.
Cons of KitchenAid Grain Mill
- Slower Processing for Larger Quantities: It takes time to mill fine flour, especially in bigger batches. I often grind in smaller amounts and pause to let things cool, which extends the total time. You need patience if you bake for a crowd or prep weeks ahead. This slower pace encourages mindful cooking sessions but might challenge you during holiday rushes when time feels tight.
- Potential Strain on Your Mixer Motor: Extended sessions can make the motor work hard and heat up. I always monitor it closely and follow rest guidelines to protect my investment. You avoid heavy use if you have a lighter-duty mixer model. Staying attentive prevents any long-term issues and keeps your valuable stand mixer running strong for all its functions.
- Not the Finest Possible Flour Texture: The finest setting produces great results but not quite as powdery as commercial ultra-fine white flour. I find it perfect for most recipes, yet some delicate pastries benefit from adjustments. You adapt your techniques slightly for optimal outcomes. A quick sift helps when needed, and I have found creative ways to work with the natural texture for consistently wonderful results.
- Noise Level During Operation: It runs noticeably louder than regular mixing. I run it when the house is active to avoid disturbing quiet moments. You get used to it quickly, but it stands out compared to quieter dedicated mills. The sound signals productive work happening, and I often pair it with music or conversation to make the process even more enjoyable.
- Limited Hopper Capacity Requires Refills: The hopper holds a modest amount, so frequent top-ups happen during bigger jobs. I keep extra grains nearby, which works fine but interrupts flow a bit. You plan accordingly for efficiency. These short breaks actually give me a chance to check on other kitchen tasks and keep the whole baking process flowing smoothly.
Understanding these points helps you set realistic expectations. I still choose it regularly because the pros outweigh the cons for my lifestyle.
Tips and Best Practices for Long-Term Success With KitchenAid Grain Mill
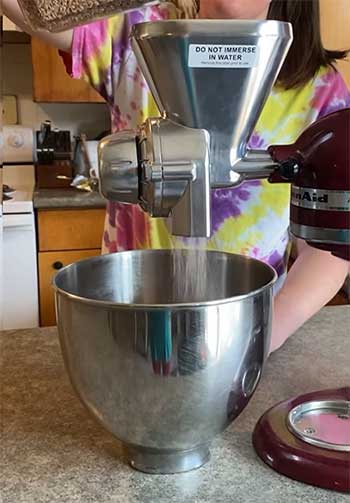
- Regular Cleaning Keeps Everything Running Smoothly: After each use, I brush out residue thoroughly with the included tools or a soft brush. You prevent buildup that could affect performance. For deeper cleans, hand wash parts with mild detergent and dry completely before storage. This quick routine takes less than five minutes and ensures every future batch comes out fresh and contaminant-free.
- Lubricate Your Mixer Periodically: Since the mill makes the motor work harder, I grease the mixer gears annually following official guides. You extend the life of your entire setup this way and maintain optimal power. A simple application keeps everything operating at peak efficiency and avoids unexpected slowdowns during important baking days.
- Grind in Small Batches and Allow Cooling Time: I never exceed recommended limits like ten cups at once. Pausing every few cups protects the motor and keeps flour from getting too warm. You preserve quality and avoid unnecessary wear. These intentional pauses also let me enjoy the aroma of fresh flour filling the kitchen, turning the task into a pleasant ritual.
- Store Grains Properly for Best Results: Keep whole grains in airtight containers in a cool, dry place. I buy fresh stock regularly so the mill processes high-quality input. You taste the difference in the final product. Proper storage maximizes the vibrant flavors and nutrients that make your homemade creations truly special.
- Adjust Settings Gradually and Test Flour: Start coarser and tighten slowly while testing small amounts. I note what works best for different grains like wheat versus corn. You develop intuition that makes milling second nature over time. This method prevents wasted grains and helps you dial in the exact consistency your recipes demand.
- Inspect Parts Before and After Use: Check for any wear on burrs or attachments occasionally. Tighten connections as needed. You catch small issues early and enjoy consistent performance. Regular checks become second nature and give peace of mind that your equipment stays in top condition.
- Experiment with Different Grains Safely: Stick to low-moisture, non-oily varieties as recommended. I rinse and dry grains if needed, then mill away. You discover exciting flavors while keeping the equipment safe. Trying new options like barley or spelt has opened up creative recipes that my family now requests on repeat.
Following these habits turns the grain mill into a reliable kitchen staple. I have avoided common pitfalls by staying mindful, and my attachment looks and works like new after extensive use. You create a sustainable routine that supports years of fresh baking adventures.
Comparison of KitchenAid Grain Mill With Other Brands
- How the KitchenAid Performs Against Dedicated Stand-Alone Mills Like NutriMill
I compared my KitchenAid setup directly with a NutriMill model during a big baking month. The NutriMill grinds faster overall, especially for large volumes, and produces very fine flour consistently.
You appreciate the speed if you mill weekly for a big family. However, the KitchenAid wins on versatility since it integrates with your existing mixer for multiple tasks without extra counter space.
I prefer the KitchenAid for occasional use because it costs less upfront and stays out of sight until needed. The NutriMill feels like a dedicated workhorse, but you pay more for that specialization and lose the multi-function convenience.
- KitchenAid Versus Mockmill Attachments and Full Mills
Switching focus to Mockmill options revealed interesting differences in my test runs. Mockmill attachments and full mills often deliver cooler flour on fine settings and achieve a finer texture more easily.
You notice less heat buildup during longer grinds, which helps preserve nutrients better in some cases. My KitchenAid requires more careful batching to avoid warmth, yet it handles a wider variety of tasks within the mixer ecosystem.
Mockmill shines for frequent fine milling enthusiasts willing to invest in a separate unit. I stick with KitchenAid for its seamless fit into my current kitchen workflow and solid performance on a budget.
Both deliver fresh results, but your choice depends on space, frequency, and how much you value integration versus standalone power.
- Why KitchenAid Stands Out Compared to Hand Crank or Budget Manual Mills
Manual mills demand physical effort and time, which I tried briefly before settling on the powered KitchenAid.
You get consistent results with far less labor using the attachment, especially when mixing dough right after in the same bowl. Hand cranks work in emergencies or for off-grid situations, but they lack the efficiency and adjustability I enjoy daily.
The KitchenAid bridges convenience and quality beautifully for modern home bakers like me. You avoid fatigue while still gaining full control over your flour.
Also Read: Problems With Cuisinart Salt And Pepper Mill.
Frequently Asked Questions (FAQ)
Yes, it works well for small to medium batches and delivers fresh, flavorful flour with proper use and breaks.
Dedicated models like Mockmill or NutriMill often top lists for frequent users, but KitchenAid excels for mixer owners seeking convenience.
You mill wheat, corn, oats, rice, and more into flours and cracked grains for breads, cereals, baked goods, and gluten-free recipes.
Yes, it is worth it for fresh grinding if you already own the mixer, offering similar convenience to the grain mill for meats and sausages.
Wrapping It Up
Investing in the KitchenAid Grain Mill attachment brings joy, health benefits, and unmatched flavor to your baking. You create superior results that transform ordinary meals into memorable ones.
Do not wait—add this tool to your kitchen today and start enjoying the rewards immediately. Your future self and family will appreciate every delicious bite.