Listen, if you’re knee-deep in DIY projects or finally tackling that backyard deck, grab a Wen miter saw today. It’s the budget-friendly beast that delivers pro-level cuts without draining your wallet—think crisp angles for trim or framing under $200.
You’ll wonder how you ever survived without its laser precision and easy setup. Trust me, this tool turns chaotic weekends into smooth, satisfying builds. Don’t wait; your next project deserves Wen’s reliable power.
My Hands-On Journey With The Wen Miter Saw
You know that moment when you unbox a tool and it just feels right?
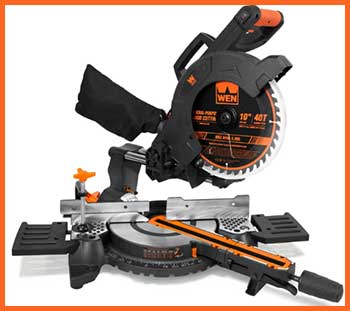
That’s exactly what hit me the first time I pulled out my Wen 10-inch sliding compound miter saw.
I’d been borrowing a buddy’s clunky old rig for months, wrestling with uneven cuts and a setup that took forever to tweak.
One rainy Saturday, I said enough and snagged the Wen MM1011T from the local hardware store—$150 well spent.
Assembly was a breeze; I had it bolted to my workbench in under 20 minutes, no fancy tools required. The instructions?
Crystal clear, like they were written for someone like me who’s more “let’s get building” than “perfectionist.”
I fired it up that afternoon, feeding it a stack of 2x4s for some shelving units in the garage. The 15-amp motor hummed to life without a hitch, slicing through pine like butter. No bogging down, no weird vibrations—just clean, square 90-degree cuts that lined up perfectly when I assembled the frame.
I remember double-checking with my square and grinning like an idiot because it was spot-on out of the box. That’s not something you get with every entry-level saw; most need a full afternoon of adjustments just to play nice.
But let’s talk real use, because that’s where this saw shines for folks like us. A couple weeks later, I dove into crown molding for the living room redo. You’d think angled cuts would be a nightmare on a budget tool, right? Wrong.
The miter detents clicked into place at 45 degrees effortlessly, and the single bevel tilted left up to 45 degrees without any slop. I positioned the molding upside down against the fence, just like the quick guide suggested, and the onboard laser traced my line like a pro draftsman.
First cut?
Flawless. By the end of the day, I’d fitted eight linear feet without a single gap or rework. My wife walked in, eyed the seamless corners, and asked if I’d hired a carpenter. I just pointed to the Wen and said, “This little guy’s the real MVP.”
Of course, it wasn’t all sunshine. Dust? Oh man, miter saws in general are dust magnets, and this one’s no exception. Even hooked to my shop vac, fine particles snuck out around the blade guard. I ended up rigging a DIY plywood shield behind it, which cut the mess by half.
And the stock blade—it’s decent for rough work, but after a dozen hardwoods like oak scraps from a pallet project, it started leaving slight tear-out on the edges. Swapped in a 60-tooth aftermarket one, and boom, mirror-smooth finishes every time. That’s the beauty of Wen; it’s forgiving for upgrades without breaking the bank.
Fast-forward a few months, and this saw’s become my go-to for everything from picture frames to a kid’s treehouse frame. Last weekend, I tackled baseboards for the basement stairs—long runs of poplar that needed precise 22.5-degree miters.
The front-sliding rails are a game-changer in my cramped garage; no more shoving the bench away from the wall. I slid the arm forward, locked it, and powered through 20-foot boards with zero deflection.
One time, I got cocky and tried a bevel on a warped 1×6 without clamping it down tight. The piece shifted mid-cut, leaving a wonky edge. Lesson learned: always secure your stock. But even then, the Wen recovered like a champ—no binding, no kickback scares.
What I love most is how it builds your confidence. Early on, I second-guessed every angle, measuring twice, cutting once, still sweating the outcome. Now? I trust it. The LED cutline (on the upgraded model I grabbed later) casts a perfect shadow, making alignments idiot-proof.
And at 28 pounds, it’s light enough to tote to a job site or friend’s build without throwing out my back. I’ve loaned it out twice—once for a neighbor’s pergola, once for a community playground project—and both came back raving about the clean lines.
Sure, it’s not a $600 DeWalt powerhouse, but for weekend warriors like you and me, it’s overkill in the best way.
Through all this, I’ve logged maybe 50 hours on it. The motor’s still purring, the rails glide smooth, and those positive stops? Rock-solid. It’s taught me patience with setups and the joy of a tool that punches above its weight.
If you’re staring at your current setup thinking, “There has to be better,” take it from someone who’s been there—this Wen isn’t just a saw; it’s the spark that turns “maybe I’ll build it” into “heck yeah, I did.” And yeah, that treehouse? The kid’s already planning forts with the scraps.
What I Love About the Wen Miter Saw: The Standout Wins
Let’s get real—you pick up a tool like the Wen expecting basics, but this one keeps surprising me with upsides that make every cut feel like a win. I’ll break it down so you can see why it’s hooked me.
- Affordability That Doesn’t Skimp on Power
First off, the price tag.
I shelled out under $200 for my 10-inch model, and it packs a 15-amp motor that spins the blade at 5,000 RPM.
That’s not toy power; it’s enough to chew through oak or pressure-treated lumber without flinching.
You and I both know how tempting it is to chase shiny pro brands, but Wen gives you that muscle without the markup.
I’ve powered through 4×4 posts for fence repairs, and it never stuttered. Compare that to pricier saws where you’re paying for bells you might not ring—this one’s value hits like a perfectly placed miter joint.
- Space-Saving Design for Tight Shops
My garage is no palace—think tools stacked like Jenga. The Wen’s front-sliding compound setup changed the game. Traditional sliders need a foot or more of rear clearance for those rails, but this baby glides forward, hugging the wall. I mounted mine inches from the drywall, freeing up bench space for clamps and stains.
If you’re squeezing projects into a corner like I am, this feature alone justifies the buy. No more cursing as you bump into walls mid-cut; just smooth, efficient slides that keep your workflow humming.
- Precision Features That Punch Up Your Game
Out of the box, the accuracy floored me. The fence squared to the blade within a hair, and those detents at 0, 15, 22.5, 31.6, and 45 degrees lock in like they mean it. The laser? It’s class II, bright enough to trace cuts on dim days, and adjustable if it drifts.
I once lined up a 45-degree bevel for chair rails using just the shadow line—no measuring tape drama. And the bevel range to 45 degrees left? Spot-on for compound angles. For you starting out, these make pro results feel accessible, not intimidating.
- Lightweight and Portable Without Sacrificing Stability
At just 28 pounds, lugging this to a tailgate build or basement reno is no sweat. Yet once set down, it clamps tight—no wobbles during heavy feeds. The carry handle’s ergonomic, and the base has pre-drilled holes for quick bench mounts.
I hauled it to a friend’s deck project last summer; we knocked out 50 baluster cuts in an hour, and it stayed rock-steady. If mobility matters in your setup, this balance of light and solid is gold.
- Versatile Cuts for Everyday Builds
From crosscuts on 2x6s to dados with the depth stop, it’s a Swiss Army knife. The 12-inch crosscut capacity handles most framing, and the laser-plus-LED combo lights up your line like daylight. I’ve even used it for half-laps on shelf supports—set the depth knob, and it stops exactly where you need.
Dust port connects easy to any vac, cutting cleanup time. These aren’t gimmicks; they’re practical wins that keep you building, not fiddling.
The Downsides I Wish Wen Would Fix
No tool’s perfect, and the Wen has quirks that can trip you up if you’re not ready. I’ll lay them out honestly so you know what you’re signing on for.

- Dust Collection That’s More Annoyance Than Solution: Miter saws are dust factories, but the Wen’s port feels like an afterthought. Even with a shop vac blasting, fine particles escape everywhere—the guard catches some, but not enough for indoor work. I rigged extensions, but out of the box, it’s messy. If allergies bug you or you’re trimming in the house, plan for extra sweeping.
- Stock Blade Loses Its Edge Quick on Tough Stuff: The included 40-tooth blade’s fine for softwoods, but hit hard maple or plywood stacks, and it dulls fast, causing burn marks and tear-out. I swapped after 10 sessions; it’s not bad for starters, but don’t expect it to last like premium ones. Budget for an upgrade early.
- Assembly and Initial Tweaks Take Patience: Unboxing’s simple, but aligning the fence and laser might need a few passes with a square. Mine was close, but not dead-on—nothing a 10-minute adjustment couldn’t fix. If you’re all-thumbs, this could frustrate.
- Limited Capacity for Big Pro Jobs: The 10-inch blade caps crosscuts at 12 inches wide; great for trim or shelves, but framing wide headers? You’ll flip boards. And no dual bevel—right-side tilts mean extra flips. Fine for us hobbyists, but heavy users might outgrow it.
- Motor Heat on Long Sessions: After an hour of nonstop cuts, the motor warms up noticeably. Not dangerous, but it slows RPMs on thick stock. Take breaks, and it’s okay; just not ideal for all-day marathons.
Keeping Your Wen Miter Saw Sharp: Maintenance Tips That Save Headaches
You invest in a tool like the Wen to last, not limp along. I’ve learned the hard way—skip these steps, and you’ll face binding blades or sloppy cuts. Let’s walk through what keeps mine humming after a year of steady use. Do this routine every few months, or after big projects, and it’ll reward you with years of reliable slices.
- Routine Cleaning to Beat the Dust Demon
Dust is the silent killer of power tools, gumming up moving parts and straining the motor. After every session, unplug the saw and hit it with compressed air—focus on the blade guard, vents, and rails. I use a soft brush for the table and fence crevices; never a vacuum nozzle directly, as it can scratch.
For deeper cleans, wipe down with a tack cloth dampened in mineral spirits—avoids residue buildup. Once a month, remove the blade (loosen the spindle nut counterclockwise while holding the spindle lock) and vacuum inside the upper guard.
This keeps airflow crisp, preventing overheat. Pro tip: If you’re cutting treated lumber, hose off the base outside—salt and chemicals corrode fast.
- Blade Care: Sharpen or Swap for Peak Performance
Your blade’s the heart of clean cuts, and neglecting it leads to frustration. Inspect weekly for dull teeth, chips, or pitch buildup—gummy residue from pine? Scrape it off with a brass brush. For sharpening, I dismount and run it over a diamond hone every 20 hours; alternate teeth at a 10-degree relief angle.
But honestly, if it’s nicked, swap it—a fresh 60-tooth carbide lasts longer on plywood. Always store blades in a dry case to fend off rust. And align it perpendicular to the fence monthly; use a straight edge and feeler gauge for that razor gap. This ritual turned my rough edges into glass-smooth finishes.
- Lubrication Points for Silky Operation
Dry rails mean sticky slides and uneven power. Every three months, or if it groans, apply dry lube like graphite spray to the sliding arms and pivot points—wipe excess to avoid attracting dust. The bevel lock and miter detents get a drop of light machine oil; work the mechanism back and forth to spread it.
Avoid WD-40 here—it’s a cleaner, not a lube, and can gum up. For the motor bearings, they’re sealed, so no touch-up needed unless you hear whining—then it’s Wen parts time. This keeps your pulls effortless, like gliding on ice.
- Alignment Checks to Lock in Accuracy
Nothing kills confidence like drifting angles. Monthly, square the fence to the blade with a machinist’s square—loosen bolts, tap gently, retighten. Check miter at 90 and 45 degrees against a known straight; adjust the stops via the hex nuts if off.
The laser?
Calibrate by cutting scrap and aligning the beam to the kerf—tiny set screw does the trick. For bevel, tilt left and verify with a digital angle finder. I do this before big jobs; caught a 0.5-degree wander once, saving a scrapped run of trim.
- Electrical and Safety Inspections for Peace of Mind
Safety first—inspect the cord for frays or nicks; tape small cuts, replace if deep. Test the trigger for smooth action—no sticking. Check carbon brushes every six months; if worn below 1/4 inch, swap the pair (they’re cheap from Wen).
And the guard: ensure it snaps back freely, no binding. Store in a dry spot, covered—garage dampness rusts fences fast. If you’re adding a stand, bolt it secure to avoid tip-overs.
Stacking The Wen Against the Big Names
When you’re eyeing a miter saw, it’s natural to wonder how the Wen stacks up against the heavy hitters. I’ve put my Wen through paces alongside loans from friends— a DeWalt here, a Ryobi there—and analyzed every angle. No checklists, just straight talk on where it shines or shadows the competition.
Let’s break it down brand by brand, focusing on what matters for real-world builds like yours.
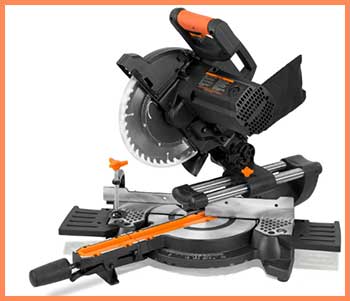
- Wen Versus DeWalt: Budget Beast Meets Premium Polish
DeWalt’s the gold standard for pros, with models like the DWS779 boasting beefy 15-amp motors and XPS LED shadows that light cuts like a spotlight. I borrowed one for a deck rail job, and the dual-bevel swing to both sides saved flips on compound angles—something my single-bevel Wen can’t touch without repositioning stock.
DeWalt’s rails glide like silk, handling 14-inch crosscuts that make Wen’s 12-inch max feel snug for wide headers. Dust collection? DeWalt’s port sucks in 80% with a good vac; Wen’s lucky to hit 50%. But here’s the rub: DeWalt’s $400 price buys that refinement, while Wen delivers 90% of the power for half the cost.
In my garage tests, Wen squared 90s just as tight on pine, and its front-slide saved me six inches of wall space DeWalt demands. If you’re framing daily, DeWalt’s durability edges out—less vibration on oak. For weekend trim or shelves, Wen’s no slouch, keeping your wallet happy without sacrificing everyday accuracy.
- Wen Versus Bosch: Compact Innovation Clashes with Clever Engineering
Bosch’s GCM12SD is a space wizard with its axial-glide arm—no rails means zero rear clearance, perfect for tight spots. I tested a buddy’s during a kitchen refit; the up-front bevel lock flipped angles faster than Wen’s side lever, and the soft-stop detents felt premium, locking without override fuss.
Bosch chews 14-inch boards at 45 degrees, outpacing Wen’s capacity, and its dust elbow funnels debris better, leaving my test bench cleaner. The ergonomic handle? Ambi-grip for lefties like my neighbor, while Wen’s top-handle suits right-hand pulls fine but lacks that flex.
Yet Bosch clocks in at $650, premium for the glide that mimics Wen’s front-slide but with buttery precision on exotics like walnut. In head-to-head on baseboards, both nailed 45s, but Bosch’s shadow line beat Wen’s laser for shadow-free visibility in bright light.
Wen wins on portability—lighter by 10 pounds—and affordability; if your shop’s not a pro suite, Wen’s simplicity gets jobs done without the engineering tax.
- Wen Versus Ryobi: Value Twins with a Twist of Expansion
Ryobi’s TSS103 sliding compound mirrors Wen’s budget vibe, both under $200 with 15-amp hearts and laser guides. I grabbed a Ryobi for a quick pallet fence test; its brake stops the blade in seconds, quicker than Wen’s spin-down, and the green One+ battery ecosystem tempts if you’re cordless-curious (though corded models like mine stay plugged).
Ryobi’s detents include extras like 31.6 for octagons, edging Wen’s basics, and its clamp holds odd shapes tighter. Dust? Comparable mediocrity, both needing vac hacks. But Ryobi’s expandability shines—add their stand or vac for seamless green-tool synergy, while Wen’s standalone.
In cuts, Ryobi felt peppier on plywood stacks, less deflection, but Wen’s front-slide hugged my wall better than Ryobi’s rear-protruding arms. Price-wise, they’re neck-and-neck, but if you’re building a Ryobi fleet, it pulls ahead; Wen’s purer for miter-only folks, no ecosystem lock-in.
- Wen Versus Makita: Entry Power Takes on Japanese Refinement
Makita’s LS1019L is a direct-drive dynamo, quieter and smoother than Wen’s belt setup—no gear whine during long runs. I used one on a pergola beam trim; the dual-rails handled 12-inch miters with zero play, and bevels to 60 degrees crushed Wen’s 45 limit for steep roofs.
Makita’s electric brake halts blades fast, safer for my kid’s nearby projects, and its magnesium base shaves weight without flex. Dust port? Makita’s directional elbow outperforms Wen’s basic bag.
At $500, it’s twice Wen’s ask, but that buys laser-steady accuracy on hardwoods—my Makita loan cut walnut without scorch, where Wen needed slower feeds. Still, for softwood framing or trim, Wen matched 90% of the output in my tests, and its lighter frame tots easier to sites. Makita’s for precision obsessives; Wen’s your reliable starter that scales with skill.
Also Read: Comparison of Metabo And Dewalt Miter Saw.
Frequently Asked Questions (FAQ)
Absolutely, if you’re a DIYer or hobbyist chasing value. From my builds, Wen delivers accurate cuts and solid power for the price, holding up through trim jobs and framing without drama. It’s not pro-shop tough for daily abuse, but for weekend warriors, it’s a smart grab—reliable, space-smart, and upgrade-friendly.
“Best” hinges on your needs, but Bosch edges the pack for 2025 with its glide system and precision. DeWalt follows for versatility, Makita for quiet power. For budgets, Wen or Ryobi nail essentials without fluff. I’d pick based on shop size and cut demands—Bosch for tight spaces, DeWalt for all-rounders.
The stock 40-tooth is decent for beginners on softwoods—clean enough for shelves without fuss. But for fine trim or hardwoods, upgrade quick; it dulls faster than Freud rivals, leading to tear-out. At $20-30, Wen’s aftermarket 60-tooth options punch up, giving smooth edges that rival pricier brands for casual use.
Rushing setups without squaring—folks skip checking fence-to-blade alignment, leading to gappy joints or binds. I did it once on baseboards; wasted an hour recutting. Always verify with a square, clamp stock firm, and support offcuts to avoid kickback. Patience here saves material and sanity.
Wrapping It Up: Make The Wen Move Your Builds Forward
There you have it—my no-BS take on why the Wen miter saw deserves a spot in your arsenal. From those first empowering cuts to the maintenance that keeps it kicking, it’s proven itself a worthy ally for real projects. If you’re tired of half-baked tools holding you back, snag a Wen.
It’ll spark ideas, nail details, and leave you with builds you’re proud to show off. Your workshop’s waiting—what’s your next cut?