If you’re tired of staring at outdated, chipped countertops that make your kitchen feel stuck in the past, you should seriously consider Stone Coat Countertops epoxy kits.
I’ve transformed my own space with them, saving thousands compared to ripping everything out for new slabs, and the results feel luxurious and custom.
You can achieve that high-end stone look yourself, and it’s worth every penny for the upgrade you’ll enjoy daily.
My Hands-On Experience With Stone Coat Countertops
Let me take you back to when I first decided to tackle my kitchen counters. My old laminate tops were peeling at the edges, stained from years of spills, and just plain ugly. I dreamed of marble or granite, but the quotes I got were insane—easily over $5,000 for my modest space.
That’s when I stumbled across Stone Coat Countertops online. Their videos showed regular people like me creating stunning surfaces, and I thought, why not give it a shot?
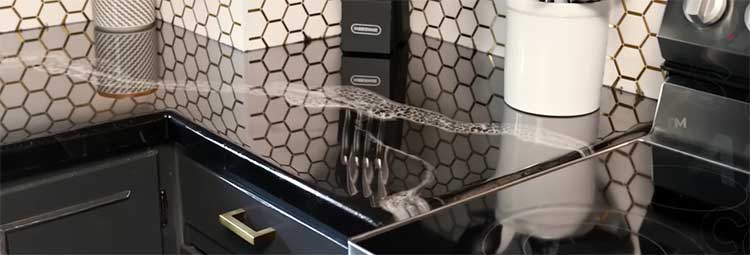
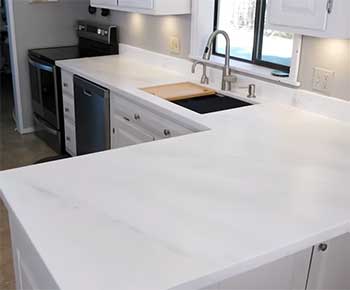
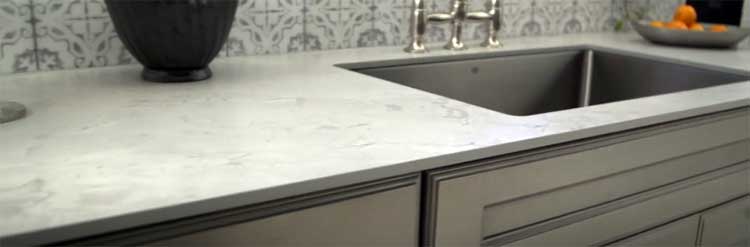
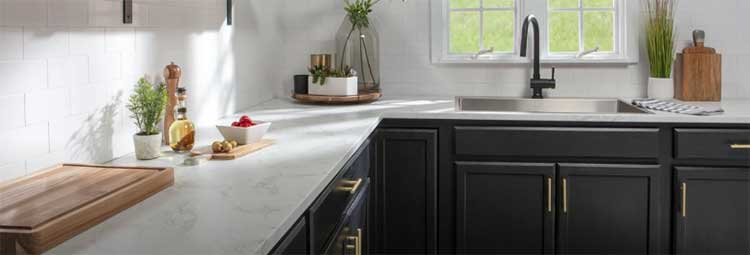
I ordered one of their popular kits, the Carrara Marble style, along with the bonding primer, metallic powders for veining, and the Ultimate Top Coat for extra protection.
The box arrived quickly, packed with everything I needed: epoxy resin, hardener, colors, and tools. I cleared my schedule for a weekend, taped off my cabinets and floors like they recommended, and got to work.
Prep was straightforward but crucial—I sanded the old laminate lightly, cleaned thoroughly with TSP to remove grease, and rolled on the primer. It dried fast, giving me a solid base. Then came the fun part: mixing the epoxy.
It’s a 1:1 ratio, super simple, and you have about 45-50 minutes of working time, which felt generous compared to stories I’d heard about other brands rushing you.
I sprayed the base colors, sprinkled powders, and used a heat gun to create those beautiful marble veins. Watching the patterns emerge was magical—you feel like an artist. I did a flood coat for depth, torching bubbles as they rose.
The next day, I added the Ultimate Top Coat for that durable, slightly textured finish that resists scratches better.
A few hiccups? Sure, I had some drips on the edges that needed sanding, and one spot where I missed a bubble. But nothing catastrophic. After curing fully—about a week for heavy use—my counters looked professional.
Friends thought I hired a pro! They’ve held up great to hot pots (up to around 500 degrees with care), kids’ messes, and daily life. The gloss pops under lights, and wiping them clean is effortless. If you’re handy or willing to follow instructions closely, you can do this too and love the outcome.
Over the years, I’ve appreciated how it turned my drab kitchen into a showpiece without the hassle of full demolition.
What I Love About Stone Coat Countertops?
- The Stunning, Customizable Appearance
You know that feeling when you walk into a showroom and fall in love with a slab of marble?
That’s what Stone Coat gives you, but tailored exactly to your taste.
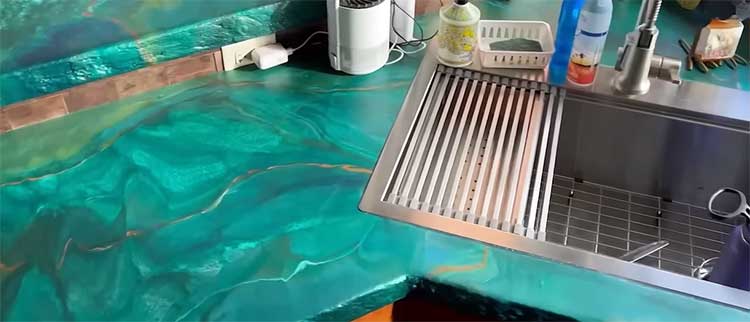
I mixed whites with grays and silvers for a classic Carrara look, but you could go bold with earth tones or exotic swirls.
The depth from multiple layers makes it shimmer differently in light—it’s not flat like paint. People compliment my kitchen constantly, asking if it’s real stone. The metallic powders create veins that catch the eye, and the clear flood coat adds that glassy depth you can’t get from regular paint kits.
I’ve seen friends do ocean-inspired blues or rustic granites, and each one feels unique. It’s like having artisan counters without the artisan price tag.
- Incredible Durability in Everyday Use
These counters take a beating and keep shining. I’ve set down hot pans straight from the oven without trivets a couple times (don’t recommend it regularly, but no burns!), and there’s zero damage.
Scratches?
Minimal, even with knives slipping or heavy pots dragging. The epoxy forms a rock-hard seal that’s waterproof, so spills bead up. In my busy home with kids and cooking marathons, that’s priceless—you don’t baby them like natural stone that etches from acids.
I’ve dropped glassware, dragged appliances, and even had minor impacts from tools during projects nearby—no chips or cracks. The Ultimate Top Coat adds that extra toughness, making it resist daily wear far better than I expected. After several years, they still look fresh, proving the heat resistance up to high temps and overall resilience.
- Budget-Friendly Transformation
This is huge for me. My whole project cost under $500, covering 40 square feet. Compare that to quartz or granite installs running thousands, and you’re laughing. No demolition mess, no contractors—just you saving big while getting a premium vibe.
I avoided the disruption of a full remodel, kept my existing bases intact, and skipped expensive slab purchases. For families on a budget or flipping homes, it’s a game-changer—you get luxury aesthetics without the luxury bill.
- Ease of Application for DIYers Like Us
Once prepped, pouring feels intuitive. The long pot life means no panic, and their videos guide you step-by-step. I felt empowered, not overwhelmed. Plus, it’s low-VOC, so no harsh fumes lingering in your home.
The kits include specialized tools and colors, making effects like marble veining achievable even for beginners. I appreciated the forgiving flow that self-levels, hiding minor imperfections from the old surface.
- Food-Safe and Hygienic Surface
After full cure, it’s safe for food prep. No pores like granite, so bacteria doesn’t hide. I chop veggies directly sometimes (though I use boards mostly), and cleanup is a breeze with mild soap. Spills don’t penetrate, keeping things sanitary in a kitchen where messes happen constantly.
- Seamless and Versatile Over Existing Surfaces
One of my favorite parts—you pour right over old laminate, tile, or even wood without tearing everything out. No seams mean no grout to clean, and it hides flaws beautifully. I’ve used leftovers for small projects like bathroom vanities, proving its versatility.
- Eco-Friendly and Low Odor Formula
Compared to solvent-heavy options, Stone Coat’s zero-VOC makeup means safer indoor work and better for the environment. No lingering smells disrupted my home life during the project.
These aspects make it stand out—you get pro results with homeowner effort.
Also Read: Comparison of Dekton And Corian Countertops.
The Drawbacks I’ve Noticed with Stone Coat Countertops
- Potential for Yellowing Over Time
I’ll be upfront—one issue many users, including me, face is yellowing, especially in sun-exposed areas. My kitchen gets morning light, and after a few years, lighter sections have a slight amber tint where objects sat long-term or near windows.
It’s not drastic on darker designs, but noticeable on whites up close. Even with their UV inhibitors, direct sunlight accelerates it for light colors. I’ve shaded windows more now, but it’s a reality—refinishing might be needed sooner in bright spaces.
- Application Can Be Forgiving But Not Foolproof
If you’re new, mistakes happen. Bubbles if you don’t torch properly, uneven veining if rushed, fish-eyes from poor prep, or drips needing sanding. I redid one small area, adding time and frustration.
Dust settling during cure can embed particles, and temperature swings affect flow. Prep is everything—grease or moisture ruins adhesion.
- Scratch Resistance Has Limits
While tough, it’s not invincible. Deep gouges from sharp objects show, especially without the top coat refreshed. High-traffic spots dull over years; I’ve seen fine scratches from abrasive cleaners or dragging heavy items. The Ultimate Top Coat helps, but isn’t bulletproof forever.
- Not Ideal for Heavy Direct Heat
Extreme or prolonged heat softens or marks it. I’ve avoided leaving crockpots directly on for hours—always use protection to prevent softening or discoloration.
- Staining from Certain Substances
Things like turmeric, red wine, or mustard can stain if left overnight. Quick wipe-ups prevent it, but forgetful moments leave faint marks that need alcohol scrubbing.
- Customer Service Experiences Vary
Some rave about help, but others report delays, unhelpful responses on issues like yellowing, or order problems. I’ve had good luck, but forums show inconsistencies.
- Long Cure Time Disrupts Life
Full hardness takes weeks—you can’t heavily use during cure, meaning kitchen downtime. Planning around that is key.
- Not as Valuable for Resale as Natural Stone
While beautiful, epoxy doesn’t add the same home value as granite or quartz. Buyers might see it as a coating, not premium slab.
These cons are manageable with care, but worth knowing upfront.
Also Read: Comparison of Neolith And Dekton Countertops.
Keeping Your Stone Coat Countertops Looking New
- Daily Cleaning Routines That Work for Me
You and I both want easy maintenance, right? I wipe mine daily with a soft microfiber cloth and mild dish soap mixed in warm water—nothing abrasive like scouring pads. It keeps the shine without streaks or residue buildup.
For fingerprints or light smudges, a damp cloth alone suffices. Avoid ammonia-based cleaners; they can dull over time. This routine takes seconds but preserves that new-counter feel.
- Handling Spills and Stains Quickly
Act fast on potential stainers like wine, coffee, turmeric, mustard, or powdered drinks—they can etch if ignored. I blot immediately with a paper towel, then clean with soap or 91% isopropyl alcohol on a cloth. Alcohol cuts grease and tough spots without harming the seal.
For oil-based messes, a bit of baking soda paste gently scrubbed works wonders. Prompt action prevents permanent marks.
- Protecting from Heat and Scratches
Always use trivets, hot pads, or cutting boards. I’ve learned the hard way—direct hot pots can cause softening or rings, though rare. For cutting, boards prevent knife gouges. Felt pads under appliances stop dragging scratches.
This habit extends life dramatically.
- Dealing with Minor Scratches or Dull Spots
Light scratches buff out with a non-abrasive polish or fine sanding followed by top coat refresh. For deeper ones, a spot flood coat fixes it seamlessly. I check annually for wear.
- Long-Term Refresh Tips
Every 6-8 years, or sooner if yellowing appears, lightly sand and apply a new clear flood coat or Ultimate Top Coat. It’s simpler than the initial pour and revives gloss and protection. Their Art Coat variant offers extra UV resistance for lighter colors.
- Avoiding Common Pitfalls
No harsh chemicals like bleach, acetone, or oven cleaners—they etch or dull. Limit direct sunlight with curtains or blinds to slow yellowing. Don’t use as a cutting surface directly. Keep humidity and temp stable during use.
- Seasonal Care and Inspection
In dry seasons, occasional mild oiling isn’t needed, but wiping prevents static dust. Inspect edges for wear; touch up drips early.
These habits keep mine gleaming years later—simple but effective.
How Stone Coat Stacks Up Against Other Epoxy Brands?
- Stone Coat Countertops Versus Dekton
You and I both know that choosing between a DIY epoxy like Stone Coat and a premium ultra-compact surface like Dekton comes down to priorities. Dekton is that high-end sintered stone from Cosentino—basically porcelain on steroids, made by fusing quartz, glass, and porcelain under insane heat and pressure. It’s built to last forever in busy kitchens.
With Stone Coat, I poured it myself over my old counters for under $500, creating custom marble veins that wow everyone. No demolition, no waiting for installers—just me transforming the space over a weekend.
Dekton?
You’re looking at professional fabrication and installation, often $80-160 per square foot, plus the heavy slabs need reinforced cabinets. My project saved thousands and avoided the chaos of a full rip-out.
Durability-wise, Dekton crushes it: truly heat-proof (hot pans straight from the stove, no problem), scratch-resistant enough for direct cutting in tests, non-porous so stains wipe away, and UV-stable for outdoor use too.
My Stone Coat handles daily life great—hot pots with trivets, no deep scratches yet—but extreme direct heat or heavy abuse can mark it, and lighter colors yellow slightly in sunlight over years.
Maintenance on Dekton is effortless—no sealing ever, just soap and water. Stone Coat is similar day-to-day, but I refresh the top coat occasionally for that like-new shine. Dekton edges show plain if chipped (rare, but happens with impacts), while my epoxy imperfections sand out easily.
If you want indestructible luxury and don’t mind the investment and pro install, Dekton feels premium and adds resale value. For me, Stone Coat delivered that high-end look on a budget, with the satisfaction of doing it myself—you get empowerment and savings that Dekton can’t match.
- Stone Coat Countertops Versus Thinscape
Thinscape is this clever engineered composite from Wilsonart—half-inch thick slabs mimicking marble or stone, no substrate needed, lightweight and modern. It’s positioned as an affordable upgrade over basic laminate, with realistic veining in trendy designs.
I love how Stone Coat lets you create truly one-of-a-kind patterns; I mixed metallics for depth that shifts in light, feeling artistic and custom. Thinscape looks sharp—European slim profile, great for floating islands or minimalist vibes—but patterns are pre-set, less personal than pouring your own veins.
Installation for Thinscape is straightforward DIY-friendly; cut with regular tools, glue down, quicker than many options. My Stone Coat took prep, mixing, and curing time, but overlaying existing counters meant zero tear-out—similar no-demo appeal, though epoxy demands more patience for bubbles and levels.
Both resist stains and moisture well once sealed (Thinscape is non-porous composite). Reviews praise Thinscape’s scratch and heat tolerance for the price—around $35-50 per square foot installed. Stone Coat costs less in materials but factors in your time; it’s held up to my family’s messes without issues.
Thinscape shines if you want thin, sleek, ready-made luxury without much hassle—perfect for quick remodels. Stone Coat gave me deeper gloss, seamless over old surfaces, and that “I made this” pride. If budget and speed top your list, Thinscape competes strongly; for creative control and overlay magic, my epoxy wins.
- Stone Coat Countertops Versus Stretta
Stretta is a laminate countertop from VT Industries—think upgraded Formica with wrap-around edges for a thick, quartz-like illusion at 1-1/8 inches. It mimics marble or slate beautifully, budget-friendly, and super easy for DIYers with patented miter systems.
Right off, Stretta screams value: pre-made sections, simple glue-and-screw install, often under $200 for standard lengths. My Stone Coat kit ran similar for materials, but the process felt more involved—priming, pouring layers, torching. Stretta skips the mess; you get that clean modern edge without epoxy fumes or cure waits.
Appearance-wise, Stretta’s white marble with gray veining looks convincingly premium from afar, eco-friendly with recycled cores. I achieved similar marble vibes with Stone Coat, but added metallic shimmer and glassy depth that laminate can’t replicate—mine has that wet-look gloss popping under lights.
Durability comparison favors everyday ease for both, but differently. Stretta resists water and stains as laminate should, low-maintenance wipe-downs. Stone Coat seals everything waterproof, food-safe after cure, handling hot pots better with care—though Stretta might edge on scratch resistance without top coat refresh needs.
Stretta appeals if you crave quick, no-fuss install and that thick-edge stone fake-out on tight budgets—great for rentals or flips. My Stone Coat transformed ugly laminate into custom art, seamless and hygienic, with versatility for quirky shapes.
If time and simplicity matter most, Stretta delivers; for unique, durable artistry over existing tops, you can’t beat the epoxy route I took.
Frequently Asked Questions (FAQ)
Potential yellowing in sunlight, possible scratches from heavy use, staining if spills linger, and application requires careful prep to avoid imperfections.
With proper care, 10+ years easily, though refreshes every 6-8 years keep them pristine.
They can yellow over time, scratch if abused, stain from prolonged spills, and demand precise installation.
The company was acquired by Polytek in 2019 and continues operating, producing kits with strong DIY support.
Final Thoughts
If you’ve been hesitating on updating your counters because of cost or complexity, grab a Stone Coat kit—you’ll thank yourself when you see the transformation.
It’s empowering to create something beautiful and lasting yourself, turning your space into one you love without the huge expense.