As a coffee enthusiast who’s spent years experimenting with different brewing methods, I’m here to share my thoughts on the AeroPress and Chemex.
My main goal in this article is to help you understand which one might suit your daily routine better by breaking down their features, strengths, and weaknesses from a hands-on viewpoint.
| Feature | AeroPress | Chemex |
| Brew Time | 1-2 minutes | 3-5 minutes |
| Capacity | 1-4 cups (depending on method) | 3-10 cups |
| Portability | Highly portable, compact | Less portable, glass carafe |
| Filter Type | Paper micro-filters | Thick paper filters |
| Brew Style | Immersion with pressure | Pour-over drip |
| Cleanup | Quick and easy | More involved |
| Price Range | $30-40 | $40-50 |
| Versatility | Espresso-like to cold brew | Primarily hot pour-over |
| Material | Plastic (BPA-free) | Glass with wood collar |
| Taste Profile | Bold, customizable strength | Clean, smooth, tea-like |
Key Differences Between AeroPress And Chemex
As someone who’s brewed many cups with both the AeroPress and Chemex, their core differences really shape the coffee experience. These affect your routine and flavors, so I’ll break them down from my hands-on view to help you decide.
- Brewing Method: AeroPress uses immersion and pressure for fast, bold extraction—steep grounds in water, then press. Chemex is pour-over drip via gravity, pouring water slowly over grounds. In my use, AeroPress yields concentrated shots quickly, while Chemex takes longer but delivers nuanced layers. Pressure ensures even solubles, but drip risks channeling without good technique. Choose AeroPress for intensity, Chemex for refined clarity.
- Portability and Durability: AeroPress’s compact plastic is tough and travel-friendly—I’ve packed it for trips without issues. Chemex’s glass carafe is elegant but fragile and stationary. This makes AeroPress great for on-the-go, Chemex for home use. Parts are replaceable cheaply for AeroPress; Chemex breakage means full replacement.
- Capacity and Serving Size: AeroPress is for 1-4 cups, best for solos to avoid waste. Chemex handles up to 10 cups for groups. For entertaining, Chemex brews batches at once; AeroPress requires multiples, which can be tedious. It suits personal or social needs differently.
- Filter and Taste Profile: AeroPress micro-filters (paper or metal) let oils through for fuller body and crema. Chemex thick filters remove sediments for clean, bright brews. Same beans: AeroPress bolder with depth, Chemex lighter and fruity. I pick AeroPress for rich roasts, Chemex for subtle ones.
- Time and Effort: AeroPress brews in 1-2 minutes with simple steps—forgiving for beginners. Chemex takes 3-5 minutes with precise pouring, needing practice. AeroPress fits busy days; Chemex is a mindful ritual with better results when done right.
- Materials and Aesthetics: AeroPress plastic is functional and neutral. Chemex glass with wood is iconic and display-worthy. Plastic handles rough use; glass retains heat but cools fast and looks premium.
- Versatility: AeroPress adapts to espresso, cold brew, or inverted steeps for experiments. Chemex focuses on hot pour-overs, less flexible. AeroPress for variety, Chemex for consistency.
- Cost and Maintenance: Both start low-cost, but AeroPress filters are cheaper with quick cleanup. Chemex filters cost more, with careful washing needed. AeroPress is simpler long-term; Chemex durable if handled well.
Also Read: Comparison of Hario Switch 02 And 03.
Key Features of The AeroPress
- Durability and Build Quality: Made from sturdy, BPA-free plastic, it withstands drops and rough handling. I’ve accidentally knocked mine off the counter more times than I can count, and it bounces back without a scratch. This makes it ideal for everyday use or travel, unlike more delicate brewers that might shatter.
- Compact Design: At just about 11 inches tall when assembled, it fits easily into a drawer or suitcase. I remember packing it for a road trip across the country, and it didn’t take up any noticeable space. This feature alone has saved me from bad hotel coffee on multiple occasions.
- Versatile Brewing Options: You can make everything from a strong espresso-style shot to a lighter American-style coffee, or even cold brew concentrates. I’ve experimented with inverted methods where you flip it upside down to steep longer, which lets me control the extraction time precisely for different beans.
- Micro-Filter System: The paper filters are fine enough to trap oils and sediments, resulting in a clean cup without grit. But if you prefer more body, you can use metal filters as an alternative. In my trials, switching to metal gave a fuller mouthfeel, almost like French press but without the sludge.
- Quick Brew Cycle: From grind to sip, it’s under two minutes. This speed is a game-changer on busy mornings when I need caffeine fast. I’ve timed it against other methods, and it consistently wins for efficiency without sacrificing flavor.
- Customizable Pressure: The plunger lets you apply varying force, affecting the brew’s intensity. Gentle presses yield milder coffee, while firm ones mimic espresso crema. I’ve played around with this to match my mood—strong for afternoons, subtle for evenings.
- Accessories Included: Comes with a scoop, stirrer, and funnel, plus a pack of filters to get started. I found the scoop particularly handy for consistent measurements, reducing guesswork in recipes.
- Eco-Friendly Aspects: While plastic, it’s long-lasting and reduces waste compared to single-use pods. I’ve reused mine for thousands of brews, and the filters are compostable, which aligns with my efforts to minimize environmental impact.
Pros of The AeroPress
- Speed and Convenience: In my routine, nothing beats how fast it brews. You heat water, add grounds, stir for 10 seconds, and press—done. This has been a lifesaver during rushed workdays when I can’t wait for a slow drip.
- Portability for On-the-Go Use: Weighing less than a pound, it’s perfect for travel. I’ve brewed in hotel rooms, at friends’ houses, and even on planes with hot water from the attendant. No outlets needed, just a mug and motivation.
- Flavor Customization: You control every aspect—temperature, steep time, grind. I’ve made bold, acidic brews from Ethiopian beans or smooth, chocolatey ones from Colombian. It’s empowering to tailor it to your taste buds.
- Easy Cleanup: Rinse the parts under water, and it’s ready for next time. No scrubbing carafes or dealing with stuck filters. I’ve found this reduces my overall kitchen time, leaving more for enjoying the coffee.
- Affordability: At around $30, it’s a steal compared to machines costing hundreds. Filters are cheap too—about a penny each. This low entry point let me try it without commitment, and now I’m hooked.
- Consistency in Results: Once you nail a recipe, it’s repeatable. I’ve shared my methods with friends, and they get similar outcomes, unlike finicky pour-overs that vary with pouring technique.
- Less Waste: Single-serve capability means no leftover coffee going stale. I brew exactly what I need, which cuts down on poured-out pots.
- Fun Factor: Pressing the plunger feels interactive and satisfying. It’s like a ritual that makes mornings more enjoyable, turning a chore into a highlight.
Cons of The AeroPress
- Limited Capacity: It’s best for one or two servings. When hosting friends, I end up brewing multiple times, which can feel repetitive. I’ve wished for a larger version during gatherings.
- Plastic Material Concerns: Though BPA-free, some purists prefer glass or metal. I notice a slight plastic taste in the first few uses, but it fades. Still, it’s a turn-off for those sensitive to materials.
- Learning Curve for Recipes: While simple, mastering variations takes trial and error. I’ve wasted beans on over-extracted batches early on, figuring out ideal ratios.
- Filter Dependency: You need specific micro-filters, which aren’t always in stores. I’ve run out mid-week and had to improvise with cut paper towels, which isn’t ideal.
- Not Ideal for Large Groups: As mentioned, scaling up is tedious. For family breakfasts, I switch to other methods to avoid the assembly line feel.
- Potential for Mess: If you press too hard or invert wrong, spills happen. I’ve cleaned coffee off counters more than once due to user error.
- Shorter Extraction Time: Some argue it doesn’t develop flavors as fully as longer brews. In my tastings, complex beans sometimes taste flatter compared to slow methods.
- Accessory Management: All the small parts—scoop, stirrer—can get lost. I’ve misplaced the funnel before, making pouring grounds trickier.
Also Read: Comparison of Fellow Opus And Ode.
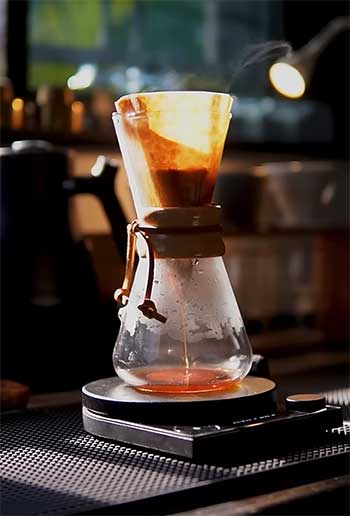
Key Features of The Chemex
- Iconic Design: The borosilicate glass is heat-resistant and non-porous, preserving purity. The wood collar adds a tactile, natural element. I’ve admired its museum-worthy aesthetics, as it’s even in MoMA’s collection.
- Large Capacity Options: Available in sizes from 3 to 10 cups. My 8-cup model handles brunches effortlessly, brewing enough for everyone at once.
- Thick Paper Filters: Bonded filters remove more oils and fines than standard ones, yielding a crisp brew. I’ve found they eliminate bitterness, letting subtle flavors shine.
- Pour-Over Mechanism: Encourages even extraction through controlled pouring. I use a gooseneck kettle for precision, creating blooms that release aromas beautifully.
- Heat Retention: Glass holds warmth well during brewing. I’ve noticed coffee stays hot longer in the carafe compared to open drippers.
- Simplicity in Parts: No moving pieces—just the carafe and filters. This minimalism appeals to my preference for uncomplicated tools.
- Versatility in Serving: Doubles as a serving vessel. I pour directly from it, which is convenient for sharing.
- Eco-Considerations: Filters are compostable, and the glass is recyclable. I’ve appreciated this in my sustainable living efforts.
Pros of The Chemex

- Exceptional Clarity in Flavor: The filters strip out sediments, delivering a tea-like smoothness. I’ve tasted floral notes in light roasts that were muddled in other methods.
- Aesthetic Appeal: It looks stunning on the counter. Guests often comment on it, turning coffee time into a conversation starter.
- Group Brewing Capability: Perfect for multiple people. I’ve served brunches where everyone gets hot coffee simultaneously, no waiting.
- No Electricity Needed: Just hot water and gravity. This reliability shines during power outages or outdoor use.
- Enhanced Aromas: The open design lets scents waft up. I inhale deeply during pours, heightening the sensory experience.
- Durable Glass Construction: Resists thermal shock. I’ve poured boiling water without cracks, unlike cheaper glassware.
- Easy to Scale Recipes: Adjust grounds and water for volume. I’ve gone from single cups to full carafes seamlessly.
- Community and Recipes: Tons of shared techniques online. I’ve adapted championship methods to elevate my brews.
Cons of The Chemex
- Longer Brew Time: It takes 3-5 minutes, plus heating water. On hurried mornings, I’ve skipped it for quicker options.
- Fragility of Glass: Prone to breaking if dropped. I’ve been extra careful, but it’s not forgiving like plastic.
- Technique Sensitivity: Poor pouring leads to uneven extraction. Early attempts were channeling disasters until I practiced.
- Filter Costs and Availability: Thicker filters are pricier and harder to find locally. I’ve ordered in bulk to avoid shortages.
- Heat Loss Post-Brew: Without insulation, coffee cools quickly. I’ve transferred to thermoses for longer sessions.
- Cleanup Effort: Rinsing the carafe and disposing wet filters takes more time. Grounds stick sometimes, requiring scrubbing.
- Not Portable: Bulky and breakable for travel. I’ve left it home during trips, missing its brews.
- Limited Versatility: Mainly for hot pour-over. Cold brew attempts are messy compared to dedicated tools.
Brewing Techniques And Tips
Let me walk you through how I use each, based on countless trials.
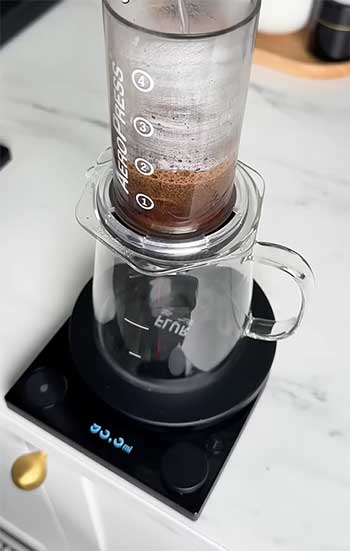
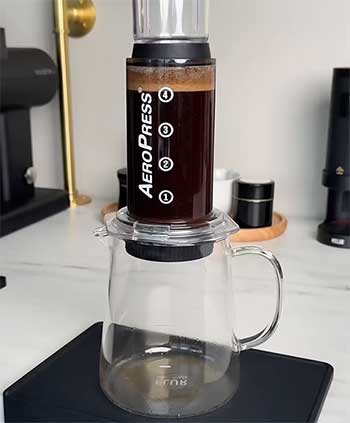
For AeroPress, I start with medium-fine grounds, about 17 grams for one cup.
Heat water to 200°F, add to chamber, stir 10 seconds, then press slowly over 30 seconds.
Inverted method: Assemble upside down, add coffee and water, steep 1 minute, flip, press.
Tips: Use fresh beans, experiment with ratios—1:15 for balanced. Avoid over-pressing to prevent bitterness.
Chemex routine: Coarse grounds, 40 grams for 600ml water at 205°F. Wet filter, add grounds, bloom with 80ml water for 30 seconds, then pour in spirals, keeping level even. Total time around 4 minutes.
Tips: Gooseneck kettle essential for control. Pulse pouring prevents overflow. Rinse carafe immediately to avoid stains.
Comparing, AeroPress forgives errors more; Chemex punishes bad technique with weak coffee. I’ve refined both, but AeroPress feels accessible, Chemex rewarding.
Also Read: Comparison of AeroPress And Clever Dripper.
Frequently Asked Questions (FAQ)
Some say it’s too plasticky, potentially affecting taste initially, and limited for large batches.
It depends on you—AeroPress for speed and versatility, pour over like Chemex for cleaner, more nuanced flavors.
Small capacity, dependency on specific filters, and a slight learning curve for optimal results.
Yes, if you want cleaner coffee without sediment; cafetière leaves more oils and grounds, but AeroPress filters them out for a smoother cup.
Final Thoughts
Wrapping this up, I’ve shared my experiences with the AeroPress and Chemex to give you a clear picture of what each brings to the table.
Whether you’re grabbing a quick brew or savoring a slow pour, think about your lifestyle—you might find one fits perfectly, or like me, enjoy both for different moments. Give them a try and see what elevates your coffee game.